
Settings and Tips for PCTV w-lantv
If you have just purchased the PCTV w-lantv wireless TV solution from PCTV Systems and would like some tips about how to get perfect wireless digital TV reception on your computer for every channel, then this blog may be helpful to you.

PCTV Systems make a number of products for digital TV on a computer, so if your product does not look like the one in the picture above then this blog may not be what you are looking for, although you may find some useful tips if you have a related product.
By the way, if you live in Australia, Britain or Europe check out PCTV System's latest offering for digital TV, the PCTV Broadway 2T. This is, in my opinion, a better option than the PCTV w-lantv simply because it is newer with a better design and more hardware features like live video camera streaming and 2 USB ports for connecting devices (in future).
NOTE: These products are for digital TV and require a digital TV signal. So if you are still on an analog TV signal, then this product/blog does not apply to you.
PCTV w-lantv Components
Before you look at the "setup steps and tips" below you should pause for a moment and look at the bullet list below to ensure you are aware of the main hardware and software parts that come with PCTV w-lantv:
The Hardware
- w-lantv Wirless Access Point - AP 50n (the big box in the picture above)
- w-lantv USB dongle (just below the AP 50n)
- nanoStick Solo DVB-T USB receiver (top right in the picture above)
The Software (all on one CD)
- w-lantv software
- TV Center software
You should also read this bit to find out what the above parts all do before reading the setup steps below:
w-lantv Wirless Access Point
If you have a wireless network at home with internet access your DSL modem/router is probably also a Wireless Access Point (WAP), or you may have a combination of a separate DSL modem connected to a WAP.
The w-lantv is just a WAP, nothing more except that it also has a coaxial cable socket that connects to your coaxial cable in order to receive your TV signal for transmission wirelessly to your computer.
The w-lantv WAP can be used as a separate (and second) wireless network in your home dedicated to transmitting your TV signal wirelessly (which is what I recommend in this blog); or you could use an ethernet cable and connect it to your DSL modem/router if you want to run the internet and the TV off your internet wireless network (which I do not advise as this will result in slower performance).
w-lantv USB Dongle
This device connects your computer to the w-lantv WAP by wireless transmission. It is a USB dongle that is essentially the same as the wireless network card you have inside your computer for wireless access. This dongle is really only needed if your computer does not already have a wireless network card, although you can still use it even if you have a wireless network card.
nanoStick Solo DVB-T USB receiver
This device connects the w-lantv WAP to your TV's coaxial ariel cable so that it can receive the TV signal for wireless transmission.
w-lanTV software
This software is simply called "w-lanTV" and apprears in your system tray as a red or green icon on the bottom right of your screen. Green when it is connected and red when it is not connected. It is the middleware (or middleman) that connects the TV Center software to the w-lanTV WAP. It needs an active wireless connection in order to connect.
Once you have installed the TV Centre software you will find w-lanTV in the "Tools" menu.
This should be the first software you run or the TV Center software will not be able to connect and display TV.
TV Center Software
This is the TV viewing software that runs on your computer. It allows you to select and view your TV stations. So you run this software to watch TV on your computer.
The TV Center software needs the w-lanTV software to be running and connected in order to work.
Setup Steps and Tips
The steps below are pretty much described in the PCTV documentation but this will give you an overview and advice in what you can do for the perfect TV reception.
STEP 1 - Install the TV Center Softwware
Check that the version of your TV Center sotware is 6.4.1.858 or higher.
You should be able to see the version number on the PCTV CD itself (not the paper cover/sleeve, the CD itself). If you have installed the TV Center software already you can find the version number by selecting "Information" from the "TVCenter Settings" menu item from the "PCTV systems" Windows menu.
If it is an older version, simply uninstall it, now.
You can download version 6.4.1.858 from here: TVCenter 6.4.1.858
Should the link above fail then go to the PCTV Systems web site (PCTV Systems) and press the Support menu item and look for Downloads for the TVCenter software.
Once you know you have the lastest version of TV Center go ahead and install it (be sure to uninstall the previous version first, if applicable).
TIP 1 - Click the locality icon when you visit PCTV Systems web site
When you go to the PCTV Systems web site make sure you first click on the locality icon otherwise you may not find your product as certain products are country specific. At the time of this blog the locality symbol for Europe/Pacific Asia is the symbol of the British flag (i.e. the union jack).
TIP 2 - Ensure you have the latest version of TV Center installed
Ensure you install TVCenter 6.4.1.858 or higher, make sure this is the first thing you check.
You can now simply follow the instuctions in the the PCTV documentation knowing you have the right version of the TVCenter software, and/or continue to read on for more tips and follow my recommended sequence of setup steps.
STEP 2 - Splitting the coaxial cable
Now that you have the correct version of the TV Center software installed (as per step 1) you are ready to proceed by installing the hardware.
Do not worry about loading the TV Center software just yet.
Skip to step 3 now if you have a spare TV coaxial socket in your home which you want to dedicate to the PCTV w-lantv system.
If you only have one coaxial ariel TV socket the simplest thing to do is buy a coaxial splitter.
There are various styles so just pick one you like the best:


Splittling the coaxial cable can degrade the signal slighty so you might want to consider something like the Kingray 2 Port Splitter Amplifier, pictured on the right, which compensates for the slight loss. This option will cost around $50 Australian.
A splitter amplifier is not really necessary unless your TV signal is already quite weak. In my case I had trouble with some channels (SBS, C31 and GO!) and the splitter amplifer did seem to resolve the issue.
But if you have a poor signal to begin with, a splitter amplifier may not help. The problem is most likely to be your external antenna. It may not be high enough or adjusted properly or have some other technical issue. However, before you worry about your external antenna, read on, as there are other things that I will cover that affect the quality of your TV reception other than your TV aerial.
STEP 3 - Configuration
Okay, I was planning on having a quite a few more steps about exactly how to setup the w-lantv for best results but have decided to just provide the tips below. Should I get some feedback requesting more detail then I may add more steps later.
So, before you continue, simply read the "w-lantv manual" accessible from the "Documentation" menu item in the "PCTV Systems" windows menu (or on the CD itself). This provides a step by step guide for setting up. And yes, you need to actually read it all.
Follow the instructions and see how you go.
Once you have finished with the "w-lantv manual" try the tips below if you are still having problems.
NOTE: The below only applies to version 6.4.1.858 or less of the PCTV software. A later release may make some of these tips redundant.
TIP 1 - Have 2 wireless networks, one for w-lantv and the other for the internet
The w-lantv manual suggests you can use your internal network card for watching wireless TV instead of the supplied w-lantv USB dongle. This is good advice as you will not need to worry about finding or losing the USB dongle.
The w-lantv manual also suggests you can connect your w-lantv WAP to your DSL modem/router with an ethernet cable in order to use just one wireless transmitter. I found this approach to be slower in performance than running your normal wireless internet and the w-lantv WAP as 2 separate wirless networks.
So I recommend you do not use an ethernet cable to connect the w-lantv to your DSL modem/router.
You should instead run two independant wireless networks at home, your normal internet wireless and the w-lantv wireless. And you should also just use your internal wireless network card to connect to either wireless network.
You can then simply connect to your w-lantv wireless when you want to watch TV, and then connect to your normal internet wireless when you want to surf the internet (note you cannot be connected to both wireless networks at the same time as you are only using one wireless network card i.e. your internal wireless network card). This is the best option for performance.
In short, two wireless networks will give you better performance as you will have one wireless transmitter dedicated to the internet and the other transmitter dedicated to the wireless TV.
With this option you use the same wireless network card in your computer to switch between the two wireless networks. Tips 2 and 3 below tell you how to configure your w-lantv WAP and your DSL router so that they run as two separate wireless networks for better performance.
TIP 2 - Setup your DSL modem to use the 192.168.2.n IP address range
The w-lantv software that appears as a green or red icon in your system tray (at the bottom right of your Windows screen) only seems to connect if the IP address of the w-lantv WAP is 192.168.2.1. It does not seem to matter how you configure the w-lantv WAP (and I have tried all the options).
So in order to avoid network routing problems when you switch between your internet wireless and your w-lantv wireless, (as I recommend in this blog), it is better to configure your internet DSL modem/router/WAP to use the same IP address range of 192.168.2.n that w-lantv needs in order to work.
So set your DSL router to an IP address of 192.168.2.1 with a range of 192.168.2.2 to 192.168.2.254:
The picture above is of my DSL router/WAP, yours may look a little different but somewhere in your DSL router will be a "LAN Settings" menu item which will have a screen that looks very similar to the above. Also note that changing the LAN settings will not affect your DSL router, that's why you can change them. Mine had a default of 10.1.1.1 and a range of 10.1.1.2 to 10.1.1.254, but these are just defaults and can and should be changed to a more unconventional range for greater security.
So in order to avoid network routing problems when you switch between your internet wireless and your w-lantv wireless, (as I recommend in this blog), it is better to configure your internet DSL modem/router/WAP to use the same IP address range of 192.168.2.n that w-lantv needs in order to work.
So set your DSL router to an IP address of 192.168.2.1 with a range of 192.168.2.2 to 192.168.2.254:

The picture above is of my DSL router/WAP, yours may look a little different but somewhere in your DSL router will be a "LAN Settings" menu item which will have a screen that looks very similar to the above. Also note that changing the LAN settings will not affect your DSL router, that's why you can change them. Mine had a default of 10.1.1.1 and a range of 10.1.1.2 to 10.1.1.254, but these are just defaults and can and should be changed to a more unconventional range for greater security.
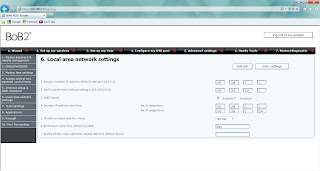
TIP 3 - Setup your w-lantv WAP to use the 192.168.2.n IP address range
Also set the IP address of your w-lantv WAP to 192.168.2.1. This will avoid IP address routing problems as your computer will always be in the correct IP address range (192.168.2.n) regardless of which wireless access point is connected at any given time:


Leave the DHCP Server enabled and use the same IP range of 192.168.2.2 to 192.168.2.254 as in the picture above.
Now both your internet wireless and your w-lantv wireless transmitters are configured to use the same IP addresses so switching between them should be less problematic.
TIP 4 - Set your Channel Width to 20MHz on the w-lantv WAP
Change your "Channel Width" from "Dynamic" to "20MHz":

In my tests doing this resulted in less pixelation and faster overall performance.
TIP 5 - Lower your encryption on the w-lantv WAP
Change the "Encryption Type" to "WEP (54M only) and enter a 14 digit password in key 1:

This will give you faster performance and as you are not going to be on the internet when watching TV having stronger encryption is not really that important. So what if someone sniff's your line, if they manage to decrypt it all they will see is the TV program you are watching.
TIP 6 - Test your old computer with a faster network card
If you are using an old computer your wireless network card may be too slow, so you may want to consider trying an external network card or even a new computer.
The simplest and cheapest test to do is to borrow a decent USB network card and see if that does the trick.
I have an old laptop at home with a maximum of 2GB RAM and could not get decent performance with it. The picture was pixelated and the viewing software hung after a few minutes of viewing.
My testing was not conclusive so I cannot be sure if the issue was processor speed, the amount of RAM or the speed of the internal wireless network card.
My best guess would be the speed of the network card (if you have tried all the other tips above).
So before you "rush out" and buy a new computer, first test the network card. Also, see if you can borrow a newer computer that has 4GB RAM and a fairly new network card. The last thing you want to do is buy a new computer and find out it was just the network card.
TIP 7 - Uninstall unnecessary software
This is a wierd one. My particular computer came with a whole bunch of proprietry software installed courtesy of the computer manufacturer.
For example, I had a "Backup" utility installed as a windows service, and a "Blue Tooth to Wireless Conflict Manager" and a bunch of other mostly useless windows services.
So always check what is installed on your computer, especially when it is new, and make sure you uninstall software that does not serve any useful purpose, other than to wear out your CPU and slow down your overall computer performance.
Be careful as you may need one or two of these software applications but most of them are unnecessary, so get rid of them. If you are unsure, google the name of the software and read up on it. You should be able to work out if you need it or not.
In my case, the so called "Blue Tooth to Wireless Conflict Manager" was actually interfering with my wireless card performance causing pixelation on the TV signal at regular intervals. As soon as I uninstalled this service the wireless card started performing perfectly. So this computer vendor installed software was actually causing performance problems.
I also uninstalled any software I thought I did not need or would not use. You will be suprised how much performance improvement you get by doing this.
And I also uninstalled my bluetooth software as I have no need for it.
So watch out for software that you did not install and that does not need to be there.
TIP 8 - Put the w-lantv WAP up High on a Wall or Shelf
As simple as this may sound the most important thing you can do is to place the WAP up high on a shelf or wall for the best transmission results, and therefore most stable reception:

You can see my WAP mounted high on the wall. I used a 3M sticker (typically used for sticking hooks on walls) to stick it on the wall. As I have used a 3M sticker I can easily remove the sticker without making a mark on the paintwork.
If you have a set of shelves, put it on the highest shelf and see how you go.If not a 3M sticker works really well and you can stick it anywhere up high.
Final Word
I cannot remember anymore tips for now but if I do I will add them here later.
I can say that following the above tips has given me perfect wireless TV reception on my computer on every channel, so I am very happy with my w-lantv.