
How to replace the hot and cold water valves for a Fisher & Paykel Smart Drive 701 Washing Machine

Introduction
If you have an old Fisher and Paykel washing machine thats reads "Smart Drive 701" on the left side of the control panel (where all the buttons are located), and you are having problems with it, then this article may help you.
It may also help if you have a similar model.
Disclaimer
This is not an official publication, it is a blog, so that means it is my opinion, and only my opinion. I am not a qualified service technician (although I have a diploma in electronics engineering) and I am not advocating you try and make any repairs yourself unless you are a qualified technician.
Symtoms
The washing machine takes a long time to fill with water. After a while it pauses, beeps about 5 times in succession and repeats this beeping at regular intervals.
If you press the Start button, it will continue to fill, but may pause again after a while and start beeping again.
It is possible to get through the wash by pressing the start button every time the washing machine pauses and beeps. But this is a tedious process.
Cause
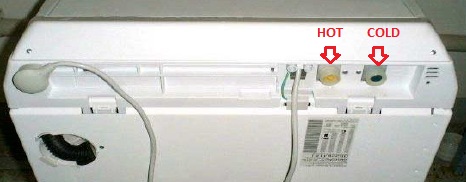
The hot and cold water valves (these valves are located where the hot and cold water hoses are connected at the back of the machine - see picture below) are electronic valves that vary the water flow and shut off the water when the water level reaches the desired/set level.

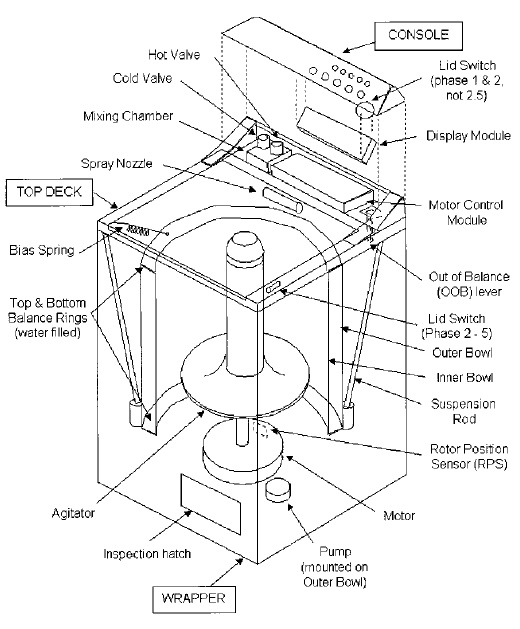
They are not mechanical valves such as those in normal hot and cold water taps around the house, they are electronic, which means they are controlled electronically by the built-in computer (which is the display module and the motor control module - see schematic below).
It also means these electronic valves wear out and break over a period of time, just like a light globe would, only they last a lot longer of course.
These valves are usually one of the first parts to need replacement. When this happens they still may work by allowing water to flow, but the rate at which the water flows will be greatly reduced, and too slow for the washing machine.
The built-in computer computer checks the water flow rate and expects it to flow at a minimum of 3 litres per minute. If the water valves are worn such that the water flow rate is less than 3 litres per minute, then the computer (smart drive) in the washing machine will detect this and eventually pause the machine and start to beep.
Schematic
Steps to Repair
- Completely disconnect from the power supply by turning off at the power outlet and removing the plug from the socket.
- Turn off the hot and cold water taps and disconnect the hoses from the washing machine. Dry up any water that may spill in the process.
- Open the lid of the washing machine and when the lid is vertical at 90 degrees simply lift it out of the sockets with a gentle pull.
- Locate 2 screws at the back of the control panel (the control panel is shown as the "console" in the schematic above) on both ends and uncrew them with a phillips head screw driver:

- Locate the hot and cold water valves and unscrew the 2 screws at the back of the machine:

- Lift the control panel ("console" in the schematic above), flip it and rest it nearby:

- Now lift the plastic holding braket that sits behind the "mixing chamber" from its socket and rest it nearby:

- Disconnect the 2 plugs from both of the hot and cold water valves:

- Clasp one of the hot and cold water valves from the top and simply pull out in an upward motion. The valve should simply pull out as it is held in by a rubber boot that is easily dislodged when pulling in an upward motion:

- Repeat the previous step for the other valve.
- Simply plug in 2 new hot and cold water replacement valves into the mixing chamber.
- Replace the plastic holding bracket back over the hot and cold water valves behind the mixing chamber, and replace the 2 screws at the back of the washing machine where the hot and cold water valves are located.
- Reconnect the control panel (console) replacing the 2 screws on each end at the back.
- Reconnect the lid.
- Reconnect the hot and cold water hoses and turn on the taps.
- Plug the washing machine back into the power outlet socket and turn on the power switch.
- Turn on the washing machine and start a wash cycle to test that water flow is now at a reasonably fast rate (minimum of 3 litres per minute).
Steps to Repair if Fully Dislodging the Mixing Chamber
You only need follow the steps below if you need to fully dislodge the mixing chamber. Otherwise the steps above should be adequate.
So you should not need to do this, but should you encounter problems these steps will assist in fully dislodging the mixing chamber:
- Completely disconnect from the power supply by turning off at the power outlet and removing the plug from the socket.
- Turn off the hot and cold water taps and disconnect the hoses from the washing machine. Dry up any water that may spill in the process.
- Open the lid of the washing machine and when the lid is vertical at 90 degrees simply lift it out of the sockets with a gentle pull.
- Locate 2 screws at the back of the control panel (the control panel is the panel with all the buttons on it that sits above the lid) on both ends and uncrew them with a phillips head screw driver.
- Lift the control panel, flip it and rest it nearby.
- Locate the hot and cold water valves and unscrew the 2 screws at the back of the machine. Now lift the plastic bracket from behind the valves and rest it nearby.
- Locate the motor control module, (see schematic), and unscrew the big screw in the centre.
- Disconnect the earth plug from the control module.
- Check for any other plugs that are connected to the control module that would prevent you from slightly dislodging the control module, and unplug.
- Dislodge the control module enough such that you can unplug and detach it from the mixing chamber, and rest the control module nearby.
- Unsrew any remianing screws that are holding in the mixing chamber.
- Disconnect the 2 plugs that are connected to each of the hot and cold water valves.
- Gently pull out the mixing chamber ensuring it is not secured to anything.
- Clasp the mixing chamber in one hand and with the other hand clasp one of the hot and cold water valves from the top and simply pull out in an upward motion.
- Repeat the previous step for the other valve.
- Simply plug in 2 new hot and cold water replacement valves into the mixing chamber.
- Now plug the mixing chamber back into the control module and replace the control module and the mixing chamber back to their original location.
- Reconnect the mixing chamber and the control module as per the disconnecting steps above.
- Replace the plastic bracket over the mixing chamber, and repalce the 2 screws at the back of the washing machine where the hot and cold water valves are located.
- Reconnect the control panel replacing the 2 screws on each end at the back.
- Reconnect the lid.
- Reconnect the hot and cold water hoses and turn on the taps.
- Plug the washing machine back into the power outlet socket and turn on the power switch.
- Turn on the washing machine and start a wash cycle to test that water flow is now at a reasonably fast rate (minimum of 3 litres per minute).